STM32F429 Discovery U-Boot
U-Boot 来源
EmCraft Systems 公司提供了支持 Cortex-M3 and Cortex-M4 芯片的 U-Boot:https://github.com/EmcraftSystems/u-boot
移植 U-Boot
EmCraft Systems 公司提供的 U-Boot 支持 STM32F429 Discovery 开发板,但网口使用 STM32 自带的 STM32_MAC,STM32F429 Discovery 开发板不带网口,所以没法使用。
本人在 EmCraft Systems 公司提供的 U-Boot 的基础上加入了 ENC28J60 网络芯片的支持,ENC28J60 网络芯片使用 SPI (只需要四根线)与 STM32F429 进行通信,所以需要实现 U-Boot 的 SPI 函数接口,为了方便实现 SPI 函数接口,本人加入了 STM32F4 驱动库(从最新的 STM32Cube_FW_F4_V1.6.0 中提取)。
U-Boot 的 SPI 函数接口:#define spi_lock() disable_interrupts();
#define spi_unlock() enable_interrupts();
int spi_init(void);
unsigned char spi_read(void);
void spi_write(unsigned char b);
void spi_set_clock(unsigned char clk_value);
void spi_set_cfg(unsigned char phase,
unsigned char polarity,
unsigned char lsbf);
#define ENC28J60_CS 1
void spi_select(int cs);
void spi_deselect(int cs);
移植好的 U-Boot 放在本人的 github 上:https://github.com/jiaojinxing/u-boot
编译 U-Boot
编译 U-Boot 在 Ubuntu-12.04 上进行,编译 U-Boot 需要使用 arm-uclinuxeabi-gcc 编译器。
arm-uclinuxeabi-gcc 交叉编译器:arm-uclinuxeabi-2010q1
下载交叉编译器后解压,然后将其中 bin 目录路径加入到 PATH 变量中,如:export PATH=/usr/lib/gcc-arm-uclinuxeabi/arm-2010q1/bin/:$PATH
下载本人移植好的 U-Boot 源码:git clone https://github.com/jiaojinxing/u-boot.git
编译 U-Boot:cd u-boot
make stm32f429-discovery_config
make CROSS_COMPILE=arm-uclinuxeabi-
烧写 U-Boot
编译完毕后会在 u-boot 目录生成 u-boot.bin 文件,使用 STM32 ST-LINK Utility 烧写到地址 0x08000000 处(烧写前建议擦除整片):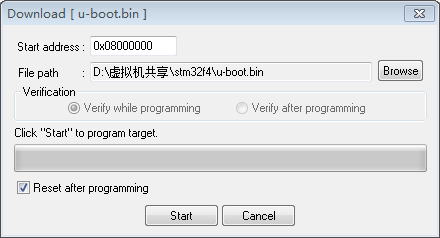
启动 U-Boot
如下是复位 STM32F429 Discovery 开发板后的串口输出:U-Boot 2010.03-00017-g2fa4d6c-dirty (Jul 05 2015 - 02:50:58)
CPU : STM32F4 (Cortex-M4)
Freqs: SYSCLK=180MHz,HCLK=180MHz,PCLK1=45MHz,PCLK2=90MHz
Board: STM32F429-DISCOVERY Rev 1.A
DRAM: 8 MB
*** Warning - bad CRC, using default environment
In: serial
Out: serial
Err: serial
Hit any key to stop autoboot: 0
TFTP from server 192.168.1.10; our IP address is 192.168.1.11
Filename 'bspstm32f4.bin'.
Load address: 0xd0000000
Loading: T #################################################################
#################################################################
#################################################################
#################################################################
done
Bytes transferred = 3813056 (3a2ec0 hex)
## Starting application at 0xD0000000 ...
下载 SylixOS 操作系统
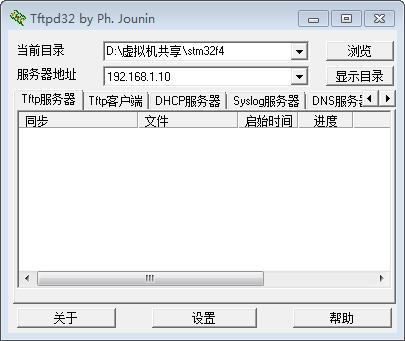
默认 IP 是 192.168.1.10,服务器 IP 是 192.168.1.11,下载地址是 0xd0000000,下载文件是 bspstm32f4.bin,启动命令是:tftp; go 0xd0000000
即从服务器下载 bspstm32f4.bin 文件到地址 0xd0000000(即外部 SDRAM 的开始地址),然后跳到地址 0xd0000000 处运行。
服务器运行 TFTP 服务器 tftpd32.exe 并将 bspstm32f4.bin 文件放入 tftpd32.exe 所在的目录。
bspstm32f4.bin 是 STM32F429 Discovery 开发板的 SylixOS BSP 镜像,该 BSP 将后续提供。
硬件连接
STM32F4 的 UART 知识请看:
http://stm32f4-discovery.com/2014/04/library-04-connect-stm32f429-discovery-to-computer-with-usart/
在这里我们使用 STM32F429 的 UART1 与 MAX232 模块连接:
| USART1_TX | USART1_RX |
|---|---|
| PA9 | PA10 |
STM32F4 的 SPI 知识请看:
http://stm32f4-discovery.com/2014/04/library-05-spi-for-stm32f4xx/
在这里我们使用 STM32F429 的 SPI1 与 ENC28J60 网络模块连接,使用 PA.04 作 ENC28J60 的片选线控制引脚:
| SPI1_MOSI | SPI1_MISO | SPI1_SCK | SPI1_CS |
|---|---|---|---|
| PA7 | PA6 | PA5 | PA4 |
